Software Troubleshooting
Why won’t the UCCNC installer complete when running the Stepcraft Multi-installer?
The most common cause that prevents the UCCNC installation from completing is due to the lack of Microsoft’s .NET Framework being installed. To do so, simply navigate to your Control Panel and select Programs. From there select the “Turn Windows Features on and off” option. Check the box for Microsoft .NET 3.5. Once your .NET framework is installed, continue with a fresh installation of UCCNC using the Stepcraft Multi-installer provided with your Stepcraft CNC system.
Why my 3D printer head (PH40) goes into Stand-By mode while working
The printers are going into standby and eventually shutting off because they are not receiving the correct signal from UCCNC that the machine is running. This is a very simple fix outlined below.
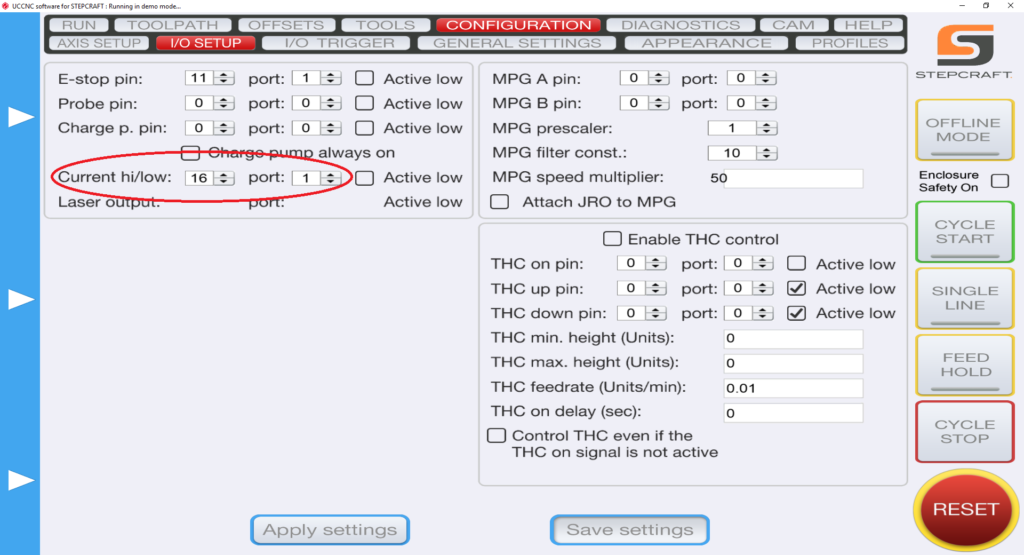
1.) Define pin outs in UCCNC –> CONFIGURATION –> I/O SETUP. On the left hand side you have “Current hi/low”. Those two pins should read “16” and “1”.
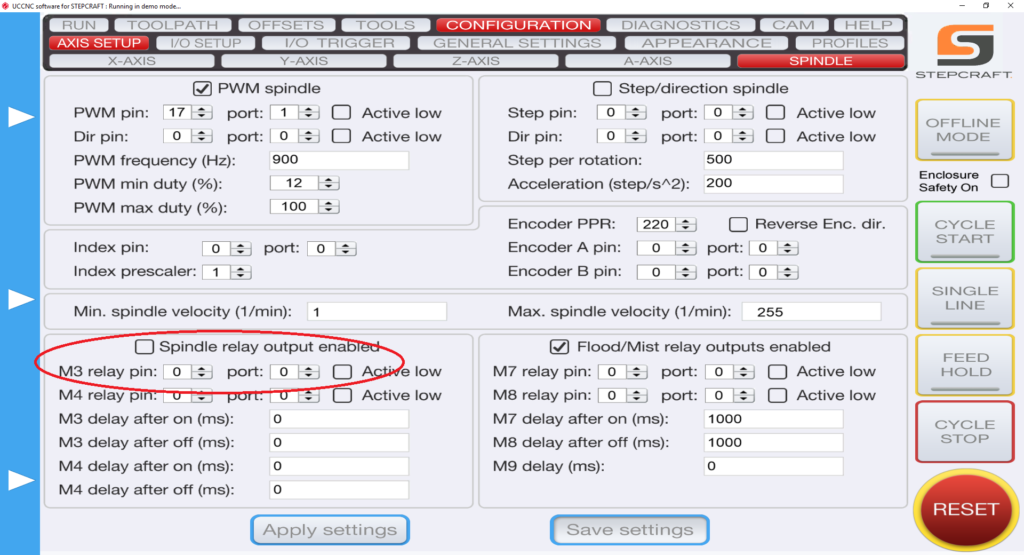
2.) Define pin outs in UCCNC –> AXIS SETUP –> SPINDLE. Bottom Left you have “M3 relay pin”. Change those values to “0” and “0” and uncheck the “spindle relay output enabled” if it is checked.
The most common cause for UCCNC running sluggish or slow, to the point where it is almost unusable, is because Windows had recently automatically installed an update in the background. This is most common when using Windows 10. CNC Drive, the makers of UCCNC software are very good with addressing these issues, however sometimes they have to wait until they even know there is an issue, which is usually when users notice the problem and contact CNCDrive or post online. If this happens to you before a UCCCNC update is available, then the fix is to uninstall the most recent Windows update (or updates). The following video shows you how to do this.
If this video still does not correct the problem, please email our support department at support@stepcraft.us
Why is the Yellow dot not in the location I set on my work piece in UCCNC?
In the live display window in UCCNC it shows you your project file as well as the location of the tool in real time. The tool is represented by a Yellow Dot on the screen. If you setup a job with the XY datum in the center of your job, then Yellow dot should be in the center of the screen in that window before you start running the job.
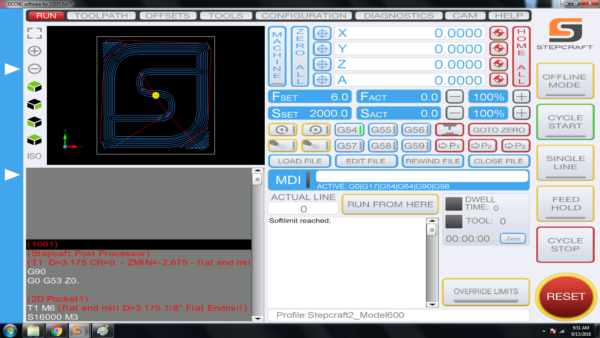
If the dot is NOT in the where you set it in your CAD/CAM file, then it is most likely because you did not ZERO X AND Y once you positioned the end mill (Spindle) at the starting location. Please use the following steps when you setup a job to ensure that your yellow dot is always where you want it before you run a job:
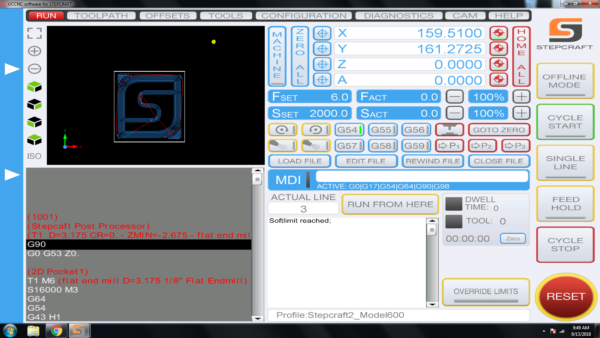
To ensure that your job is always setup properly, please follow these steps:
- Load your work piece onto the CNC and secure it
- Home your CNC machine (Press Home All on UCCNC)
- Manually move the end mill (spindle) to the location that you want to start the job on your work piece
- PRESS THE HOME BUTTON FOR Y AND X – this will reset the digital read out (DRO) to 0.00 for each.
- Load your GCode file – when you do you should notice that the yellow dot is where you set it up in your CAM file (lower left, center, etc)
- Set your Z Zero manually by lowering it to touch the material surface or machine bed (to match how your setup your CAM file) OR use a Tool Length Sensor
- Run your job!
When you home your machine, if the Z axis moves down towards the bed, it means you have a limit switch triggered somewhere on your machine and you have used the “Override Limits” button to reset and move the machine. If you try to Home the machine with the “Override Limits” button active, the Z-Axis will move straight down until it eventually crashes into the bed.
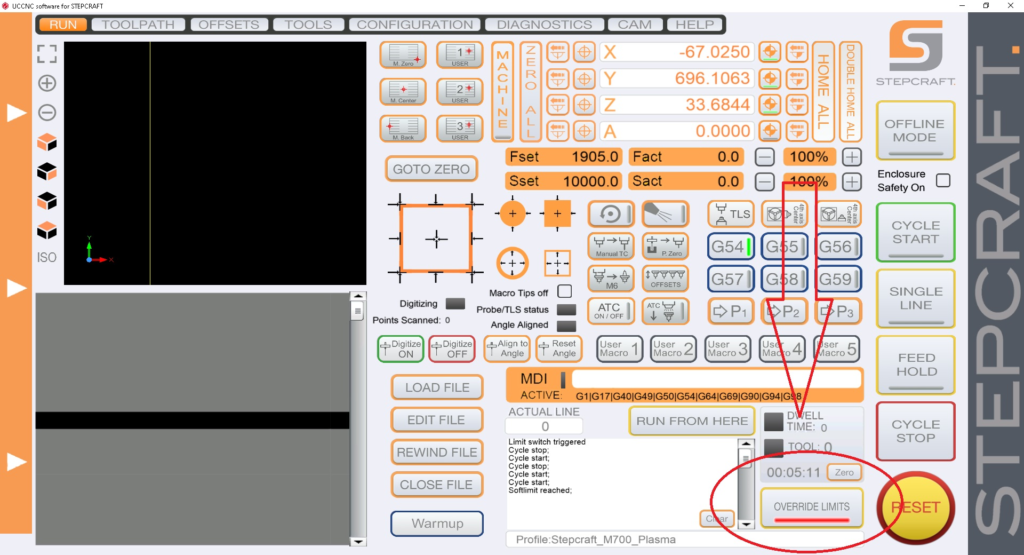
The “Override Limits” button is only to allow you to reset and jog the machine off any limit switch that may currently be engaged. Once the limit switch is disengaged, the “Override Limits” button will no longer flash red and you can home the machine. Another method to clear the switch is to engage your physical E-Stop button, which will cut power to the motors and allow you to turn the lead screws by hand to physically disengage the limit switch. For example, if your Z-Axis is on a switch and is all the way up, you can turn the screw about 1-2 turns until it is no longer activating the switch.
You can tell if a limit switch is currently active in your diagnostics screen in UCCNC. Below is an example of a machine with a limit switch currently active (green).
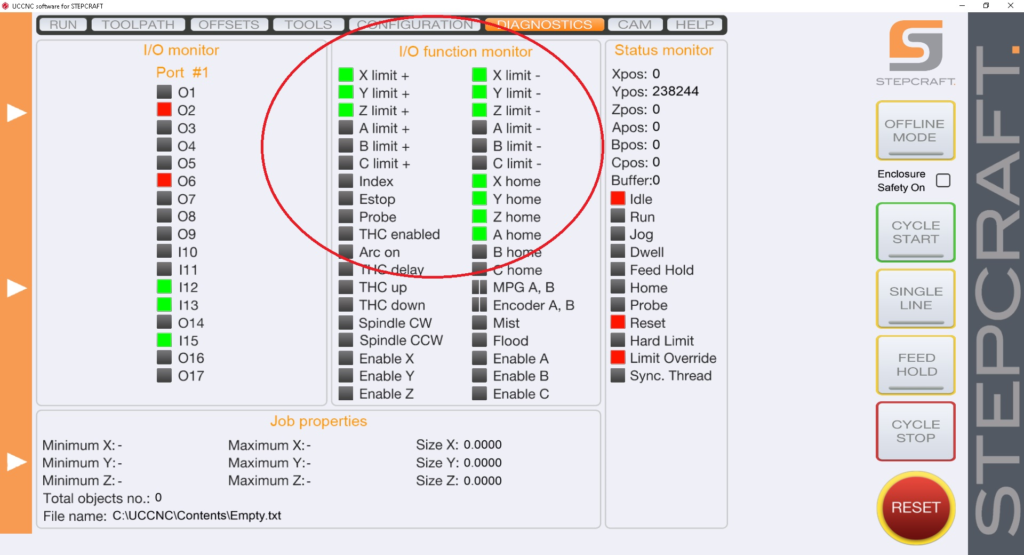
Note that the X, Y and Z limit switches are all on the same circuit, so when one is active all will show in UCCNC as active. This does NOT mean all three are active.
How come my circles are not perfectly round?
When you are machining circles on a CNC and your circles are not coming out perfectly round, it is commonly caused because there is some backlash developing on the machine. Backlash is a tiny amount of play that appears over time and is noticed when a drive changes direction.

When running in a positive direction, the gears/lead screw are engaged with the lead screw nut on the gantry, but when the stepper motor reverses direction there is a tiny space between the lead screw and the lead screw nut that has to be made up before there is positive engagement in that direction. After many, many hours of use or if your machine is not properly maintained and lubricated, then this backlash can develop.
If this is happening to you, please download this document: Stepcraft UCCNC Backlash Compensation.
This will show you how to setup backlash compensation in UCCNC so that you can “dial” out any backlash and go back to having perfect circles again.
Where can I find the M31 Macro for the Tool Length Sensor?
The M31 Macro for the Tool Length Sensor is automatically installed when you use the STEPCRAFT Multi-Installer. The best way to make sure you are up to date with our latest profiles and macros is to download the STEPCRAFT Multi-Installer here. This installer will automatically install the most up to date profiles and macros.
If you find that after using the tool length sensor your end mill is slightly above or slightly digs into your material, you may need to preform a small adjustment to the M31 macro. To preform this adjustment, you can find the procedure here.
Where can I download UCCNC?
UCCNC is the machine control software that moves your STEPCRAFT machine and interprets G-Code. In order to use your STEPCRAFT machine, you will need the UCCNC software as well as the STEPCRAFT machine specific profiles. You can download and install both from the STEPCRAFT Multi-Installer that comes on your orange USB flash drive, or download here. STEPCRAFT will always have the latest compatible version of UCCNC included in the Multi-Installer. If you are looking for the newest released version of UCCNC, you can download here (note: UCCNC may release versions newer than those included on the STEPCRAFT Multi-Installer. These versions may not have been fully tested and may cause some bugs/issues with your machine. It is reccomended to use the version of UCCNC included on the STEPCRAFT Multi-Installer).
Where Can I Download the Stepcraft Multi-Installer?
The multi-Installer can be found on the orange USB flash drive sent with every D. series CNC system, or can be downloaded from the Dropbox link below.
Stepcraft D. Series Multi-Installer:
https://www.dropbox.com/s/vytptg88ahqbc8g/Stepcraft_Multi_Installer.exe?dl=0
What post processor do I use for Vectric programs (Aspire, VCarve, Cut 2d, Cut 3D, PhotoVCarve)?
NOTE: These post processors will work for BOTH UCCNC and WIN-PC NC
From the dropdown list in Vectric programs, you will look for the following
If you have an Automatic Tool Changer: Stepcraft UCCNC ATC Arcs (mm) (*.txt)

If you do not have an Automatic Tool Changer: Stepcraft UCCNC Arcs (mm) (*.txt)

If you have an older version of Vectric software and the STEPCRAFT post processors are NOT in the dropdown list, please use the following:
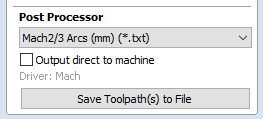
If you have an Automatic Tool Changer: Mach2/3 ATC Arcs (mm) (*.txt)
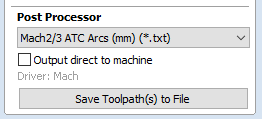
If you do not have an Automatic Tool Changer: Mach2/3 Arcs (mm) (*.txt)
After the initial launch of the M-Series line of CNC machines, a change was made in our driver system causing us to need two versions of the profile for the M.1000 machine.
How do I know which one I need? If you purchased your machine BEFORE April 2022, then you need the M.1000 profile. If you purchased AFTER April 2022, then you need the M.1000T profile.
How do I get the profile? Please contact our support department at support@stepcraft.us and we can assist you to ensure you have the correct profile.
What is the difference between the two profiles? The main difference is in the assignment of steps-per-inch (or steps-per-mm) for the newer driver cards. This profile ensures that UCCNC is configured properly for your driver card.
Are there any issues with the pre-2022 machines or drivers? NO. There are no performance, reliability, or accuracy issues with the original drivers. It is merely a software configuration change that we had to make.
Sometimes when you start UCCNC you will get the “Select the motion controller device from the list” message box that pops up. This is either happening because your UC100 interface or USB cable is unplugged or the device driver did not properly install. This video will show you how to fix this.
If you are still have trouble after watching this video, please contact our support team at support@stepcraft.us.
What does “The current job workspace is out of the set software limits” error window mean?

This error happens when your design is larger than the allowable work area on the CNC machine. Every machine has its own specific software profile that you install with UCCNC. This software profile tells UCCNC what the available work area size is on your machine. The main reason for this is to protect your machine from crashing into itself if you run a job that is larger than the machine’s capabilities. Think of the “software limits” as invisible limit switches. When you load a job into UCCNC, it looks at the G-Code automatically and compares the XYZ dimensions of your file against the software profile to make sure that the job can fit on your machine. If the settings in your file are larger than the work area, then you will get this error window.
Sometimes, if your job is NOT larger than the work area size for your machine and you get this error, you can reposition your work piece so when you zero X and Y that you fall within the work area. For example. Say your machine has a work area limits that are set to 420 mm on Y and 300 mm on X and you are trying to run a job that is 380 mm long x 280 mm wide. This job should work with no problem, however if you have the work piece positioned more than 20mm from the left side of the machines work area limit or 40 mm away from the front of the machine, and you have zeroed UCCNC in that position, then you will get this error when you start the job because it adds the job size to the position where you have X and Y zeroed and if that number is greater than 420 on Y or 300 on X it triggers the error.
It is important to take into account your “safe Z height” when encountering this error. If your safe Z height causes the Z-Axis to travel past the limits of the machine you will get this error. This is very common when working with thicker materials or long end mills. You can adjust your safe Z height in two places…
1.) In your CAD/CAM program. If you are using Vectric it will be under “Material Setup”.
2.) In UCCNC –> CONFIGURATION –> GENERAL SETTINGS. About half way down on the right side you have your “Safe Z height (Units). You can lower this number for more room.
The two values do stack, so if you are still having trouble try lowering both.
Another common cause for the error is to verify where your XY Datum is located in your design file. Many times a job might have been set with a XY datum of the lower left corner but the operator sets the machine up as if the XY Datum is in the center. This will, in most cases, cause the error because that zero position added to the jobs work size will exceed the software limits of the profile in UCCNC.
On rare occasions when you click the UCCNC installer, it will seem like it is going to run but then nothing happens. In order for UCCNC to properly install, it requires the .Net 2.0 framework and some Windows 10 machines, it is turned off by default. You can turn this on easily by following this video.
If after watching this video, you are still having problems, please email our support team at support@stepcraft.us
Understanding the Homing Procedure
Whenever you open UCCNC, the very first movement you should make with your machine is “Home All”. On a STEPCRAFT, the homing procedure begins with the Z-Axis, then the X-Axis and finally the Y-Axis. Each axis will run towards its limit switch until it engages the switch, then will run the opposite way until the switch disengages. Once all three axis have hit their limit switch, your machine is now ready to travel the full length of each axis!
This is known as a reference movement for the machine. Without this reference movement, the machine has no idea where it is along its axis and may not travel the full length back and forth. If your machine is stopping short of the full length of travel and you aren’t noticing any binding, make sure to “Home All” and try running again.
One important thing to note is that if any axis ever travels in the opposite direction of its limit switch when homing, check to make sure a limit switch is not engaged somewhere on the machine. All of the limit switches are on the same circuit, so if you tried to home your machine and the Y-Axis limit switch was pressed, the Z-Axis would travel in the OPPOSITE direction. This happens because the machine is going through the stage of homing when it backs away from the switch until it disengages. Because the Y-Axis switch was pressed, the Z-Axis will infinitely try to move away but it will never disengage.
My machine is in reset mode and I can not get it to reset, how can I fix this?
If your machine will not come out of reset mode, there are three things to check:
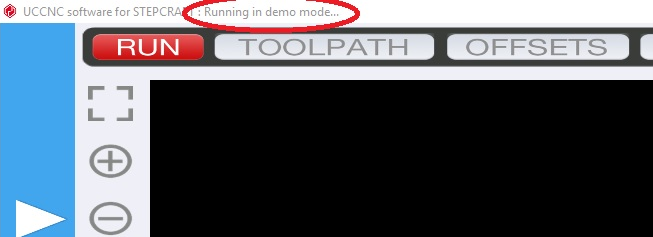
- Make sure that UCCNC is not running in Demo Mode. If UCCNC is running in demo mode, the software will not reset.
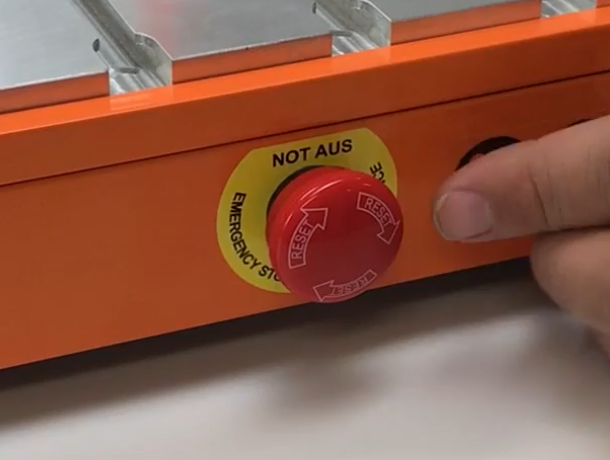
- Ensure that the emergency stop button is not press in on the front of the machine. You can disengage it by simply twisting it to the right slightly and it should pop out. If it is already out, then you can move on to #2.
- Check the Y Axis limit switch wires on the back of the machine. Sometimes these wires can be accidentally knocked out and become disconnected. Be sure both wires are plugged in correctly.

- Click on the DIAGNOSTICS tab in UCCNC. Check to see if any of the limit switch lights are on in the I/O Function Monitor. (Please see the video below starting at 1:36)
If I use Solidworks CAM or Fusion 360 CAM, do I still need to use UCCNC or Mach 3?
The purpose of any CAM program is to take your design file and turn it into G-Code by assigning tool paths to your project and outputting it in a format that a CNC machine can understand.
That being said, you still need a method of controlling the CNC machine, which is where programs like Mach 3 and UCCNC come in. They are designed to connect to the CNC machine and the G-Code files that you create in your CAM program are loaded into Mach 3 or UCCNC to run the machine.
With any CNC router, you have three main steps to creating a project:
- Design your project in a CAD/Drawing program
- Use a CAM program to assign tools and tool paths to the project
- Use a machine control program to load the G-Code files and run the CNC machine.
How do I save/find my digitized 3D Touch Probe file?
If you are having trouble saving or finding your digitized file after scanning with the 3D touch probe, you may have to force Windows to save the file as a .txt file. To do this, either initially after the scan or after opening the file, save as and type your file name, followed by .txt and enclosed in quotes. For example…
“car.txt”
“model.txt”
This will force windows to save the file as a .txt, which can be easily recognized and opened.
If an error has occurred or your system has an obstruction causing the Semi-Closed Loop System to trigger, it will activate the E-Stop mode on the machine. When this happens the first thing you need to do is take note of the line number that you are at in the G-Code window on the lower left part of the UCCNC screen. Write it down or take a photo with your cell phone.
To reset this, you press the Red reset button on the UCCNC screen and then press HOME ALL. This will reset each axis so that everything is back in sync with UCCNC. From that point, you can use the START FROM HERE button and restart the job from right where you left off.
You can view this video on how to use the START FROM HERE button:
How do I Recover My UCCNC License File?
If you have misplaced or lost your UCCNC license key file, the process of recovering it is fast and easy. The serial number located on one side of your UC100 corresponds to your hard-coded license key, as shown below. Simply contact our support team and provide them with this serial number, and you will receive your recovered license file as an email attachment.

How can I reset my Stepcraft UCCNC installation?
Can’t seem to solve a strange bug or error? Can’t find a fix here? Mismatched or changed profile settings are a very common cause, but what if you cannot locate the setting that is giving you these issues?
A fresh installation will take care of making sure your profile settings match the default ones and make sure that you are not going in circles when troubleshooting UCCNC. This short video will walk you through each step required to not only remove any trace elements of your old installation, but also covers how to re-install your profiles to reduce downtime and get your machine back up and running.
Does the UCCNC installer contain a virus?!?
Some virus protection software companies have flagged the UCCNC installer as possibly containing a “trojan virus”. Rest assured, there is absolutly ZERO threat of a virus contained within the UCCNC installer. We are working diligently with the creators of UCCNC and companies such as Norton to have this flag removed so our customers can have a smooth installation process. For now, you may need to turn your virus protection off to install the UCCNC.exe file. You can immediately turn the software back on as soon as the program has been installed. We apologize for the inconvenience! If you have any questions or concerns, please feel free to give us a call directly at (203)556-1856.
Can I use Fusion 360 from Autodesk with my STEPCRAFT CNC?
Yes, you can use Fusion 360 with STEPCRAFT. There is a post-processor that you can download for the CAM portion of Fusion 360 by going to https://cam.autodesk.com/hsmposts?
Fusion 360 is a very powerful program that can greatly expand the capabilities of what you can do with a STEPCRAFT (or any CNC for that matter).
Can I use a Mac with a STEPCRAFT CNC?
Yes! While the UCCNC and Vectric Software both run on Windows platforms, you can use a MAC as long as you run Parallels software which allows you to install Windows on your Mac. You can not run UCCNC or Vectric natively on a Mac (without Parallels). If you use Fusion 360 for CAD/CAM, then you can install that natively as they have a Mac version of that software. However, UCCNC will still need Parallels with Windows.
NOTE: Since a Mac computer is typically much more expensive than a Windows system, and the fact that UCCNC does not need a powerful computer, we recommend using your Mac for the design work and then getting an inexpensive or refurbished computer (desktop or laptop) to use to run the CNC, since the area around the CNC can potentially have dust and chips that might get on or near the computer.
